# Load adapters
[[open-in-colab]]
There are several [training](../training/overview) techniques for personalizing diffusion models to generate images of a specific subject or images in certain styles. Each of these training methods produces a different type of adapter. Some of the adapters generate an entirely new model, while other adapters only modify a smaller set of embeddings or weights. This means the loading process for each adapter is also different.
This guide will show you how to load DreamBooth, textual inversion, and LoRA weights.
Feel free to browse the [Stable Diffusion Conceptualizer](https://huggingface.co/spaces/sd-concepts-library/stable-diffusion-conceptualizer), [LoRA the Explorer](https://huggingface.co/spaces/multimodalart/LoraTheExplorer), and the [Diffusers Models Gallery](https://huggingface.co/spaces/huggingface-projects/diffusers-gallery) for checkpoints and embeddings to use.
## DreamBooth
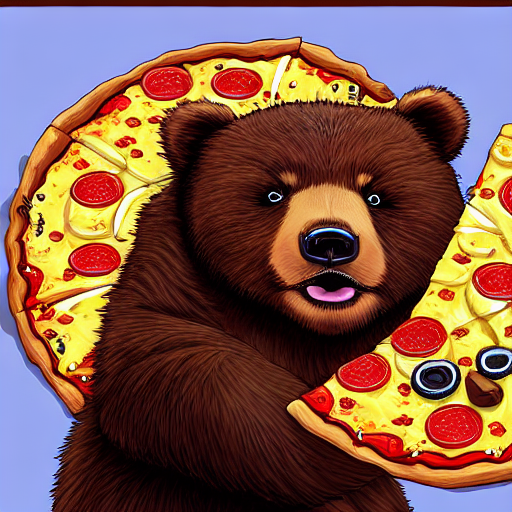
[DreamBooth](https://dreambooth.github.io/) finetunes an *entire diffusion model* on just several images of a subject to generate images of that subject in new styles and settings. This method works by using a special word in the prompt that the model learns to associate with the subject image. Of all the training methods, DreamBooth produces the largest file size (usually a few GBs) because it is a full checkpoint model.
Let's load the [herge_style](https://huggingface.co/sd-dreambooth-library/herge-style) checkpoint, which is trained on just 10 images drawn by Hergé, to generate images in that style. For it to work, you need to include the special word `herge_style` in your prompt to trigger the checkpoint:
```py
from diffusers import AutoPipelineForText2Image
import torch
pipeline = AutoPipelineForText2Image.from_pretrained("sd-dreambooth-library/herge-style", torch_dtype=torch.float16).to("cuda")
prompt = "A cute herge_style brown bear eating a slice of pizza, stunning color scheme, masterpiece, illustration"
image = pipeline(prompt).images[0]
image
```

## Textual inversion
[Textual inversion](https://textual-inversion.github.io/) is very similar to DreamBooth and it can also personalize a diffusion model to generate certain concepts (styles, objects) from just a few images. This method works by training and finding new embeddings that represent the images you provide with a special word in the prompt. As a result, the diffusion model weights stay the same and the training process produces a relatively tiny (a few KBs) file.
Because textual inversion creates embeddings, it cannot be used on its own like DreamBooth and requires another model.
```py
from diffusers import AutoPipelineForText2Image
import torch
pipeline = AutoPipelineForText2Image.from_pretrained("runwayml/stable-diffusion-v1-5", torch_dtype=torch.float16).to("cuda")
```
Now you can load the textual inversion embeddings with the [`~loaders.TextualInversionLoaderMixin.load_textual_inversion`] method and generate some images. Let's load the [sd-concepts-library/gta5-artwork](https://huggingface.co/sd-concepts-library/gta5-artwork) embeddings and you'll need to include the special word `` in your prompt to trigger it:
```py
pipeline.load_textual_inversion("sd-concepts-library/gta5-artwork")
prompt = "A cute brown bear eating a slice of pizza, stunning color scheme, masterpiece, illustration, style"
image = pipeline(prompt).images[0]
image
```
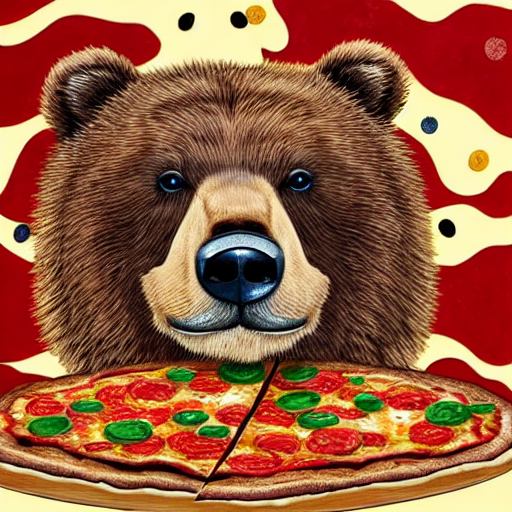
Textual inversion can also be trained on undesirable things to create *negative embeddings* to discourage a model from generating images with those undesirable things like blurry images or extra fingers on a hand. This can be an easy way to quickly improve your prompt. You'll also load the embeddings with [`~loaders.TextualInversionLoaderMixin.load_textual_inversion`], but this time, you'll need two more parameters:
- `weight_name`: specifies the weight file to load if the file was saved in the 🤗 Diffusers format with a specific name or if the file is stored in the A1111 format
- `token`: specifies the special word to use in the prompt to trigger the embeddings
Let's load the [sayakpaul/EasyNegative-test](https://huggingface.co/sayakpaul/EasyNegative-test) embeddings:
```py
pipeline.load_textual_inversion(
"sayakpaul/EasyNegative-test", weight_name="EasyNegative.safetensors", token="EasyNegative"
)
```
Now you can use the `token` to generate an image with the negative embeddings:
```py
prompt = "A cute brown bear eating a slice of pizza, stunning color scheme, masterpiece, illustration, EasyNegative"
negative_prompt = "EasyNegative"
image = pipeline(prompt, negative_prompt=negative_prompt, num_inference_steps=50).images[0]
image
```
## LoRA
[Low-Rank Adaptation (LoRA)](https://huggingface.co/papers/2106.09685) is a popular training technique because it is fast and generates smaller file sizes (a couple hundred MBs). Like the other methods in this guide, LoRA can train a model to learn new styles from just a few images. It works by inserting new weights into the diffusion model and then only the new weights are trained instead of the entire model. This makes LoRAs faster to train and easier to store.
LoRA is a very general training technique that can be used with other training methods. For example, it is common to train a model with DreamBooth and LoRA.
LoRAs also need to be used with another model:
```py
from diffusers import AutoPipelineForText2Image
import torch
pipeline = AutoPipelineForText2Image.from_pretrained("stabilityai/stable-diffusion-xl-base-1.0", torch_dtype=torch.float16).to("cuda")
```
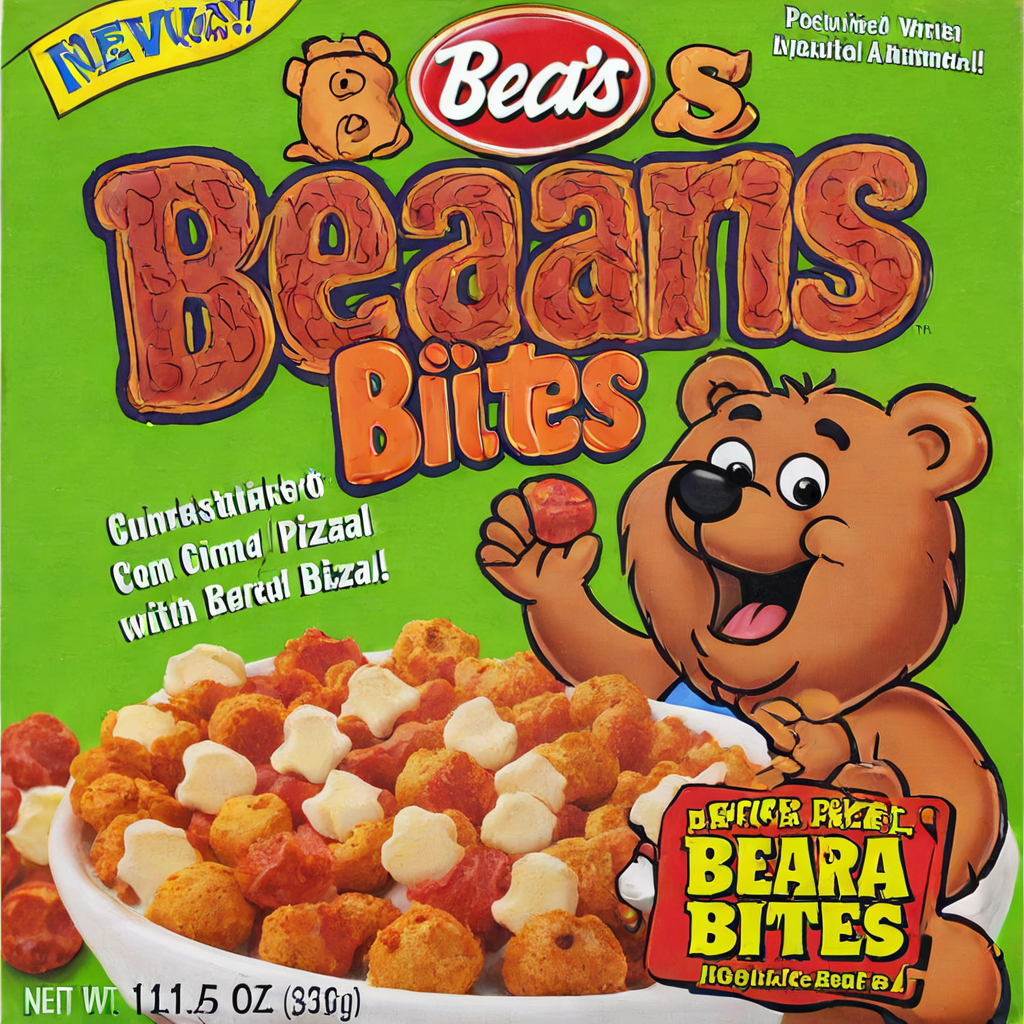
Then use the [`~loaders.LoraLoaderMixin.load_lora_weights`] method to load the [ostris/super-cereal-sdxl-lora](https://huggingface.co/ostris/super-cereal-sdxl-lora) weights and specify the weights filename from the repository:
```py
pipeline.load_lora_weights("ostris/super-cereal-sdxl-lora", weight_name="cereal_box_sdxl_v1.safetensors")
prompt = "bears, pizza bites"
image = pipeline(prompt).images[0]
image
```
The [`~loaders.LoraLoaderMixin.load_lora_weights`] method loads LoRA weights into both the UNet and text encoder. It is the preferred way for loading LoRAs because it can handle cases where:
- the LoRA weights don't have separate identifiers for the UNet and text encoder
- the LoRA weights have separate identifiers for the UNet and text encoder
But if you only need to load LoRA weights into the UNet, then you can use the [`~loaders.UNet2DConditionLoadersMixin.load_attn_procs`] method. Let's load the [jbilcke-hf/sdxl-cinematic-1](https://huggingface.co/jbilcke-hf/sdxl-cinematic-1) LoRA:
```py
from diffusers import AutoPipelineForText2Image
import torch
pipeline = AutoPipelineForText2Image.from_pretrained("stabilityai/stable-diffusion-xl-base-1.0", torch_dtype=torch.float16).to("cuda")
pipeline.unet.load_attn_procs("jbilcke-hf/sdxl-cinematic-1", weight_name="pytorch_lora_weights.safetensors")
# use cnmt in the prompt to trigger the LoRA
prompt = "A cute cnmt eating a slice of pizza, stunning color scheme, masterpiece, illustration"
image = pipeline(prompt).images[0]
image
```
For both [`~loaders.LoraLoaderMixin.load_lora_weights`] and [`~loaders.UNet2DConditionLoadersMixin.load_attn_procs`], you can pass the `cross_attention_kwargs={"scale": 0.5}` parameter to adjust how much of the LoRA weights to use. A value of `0` is the same as only using the base model weights, and a value of `1` is equivalent to using the fully finetuned LoRA.
To unload the LoRA weights, use the [`~loaders.LoraLoaderMixin.unload_lora_weights`] method to discard the LoRA weights and restore the model to its original weights:
```py
pipeline.unload_lora_weights()
```
### Load multiple LoRAs
It can be fun to use multiple LoRAs together to create something entirely new and unique. The [`~loaders.LoraLoaderMixin.fuse_lora`] method allows you to fuse the LoRA weights with the original weights of the underlying model.
Fusing the weights can lead to a speedup in inference latency because you don't need to separately load the base model and LoRA! You can save your fused pipeline with [`~DiffusionPipeline.save_pretrained`] to avoid loading and fusing the weights every time you want to use the model.
Load an initial model:
```py
from diffusers import StableDiffusionXLPipeline, AutoencoderKL
import torch
vae = AutoencoderKL.from_pretrained("madebyollin/sdxl-vae-fp16-fix", torch_dtype=torch.float16)
pipeline = StableDiffusionXLPipeline.from_pretrained(
"stabilityai/stable-diffusion-xl-base-1.0",
vae=vae,
torch_dtype=torch.float16,
).to("cuda")
```
Next, load the LoRA checkpoint and fuse it with the original weights. The `lora_scale` parameter controls how much to scale the output by with the LoRA weights. It is important to make the `lora_scale` adjustments in the [`~loaders.LoraLoaderMixin.fuse_lora`] method because it won't work if you try to pass `scale` to the `cross_attention_kwargs` in the pipeline.
If you need to reset the original model weights for any reason (use a different `lora_scale`), you should use the [`~loaders.LoraLoaderMixin.unfuse_lora`] method.
```py
pipeline.load_lora_weights("ostris/ikea-instructions-lora-sdxl")
pipeline.fuse_lora(lora_scale=0.7)
# to unfuse the LoRA weights
pipeline.unfuse_lora()
```
Then fuse this pipeline with the next set of LoRA weights:
```py
pipeline.load_lora_weights("ostris/super-cereal-sdxl-lora")
pipeline.fuse_lora(lora_scale=0.7)
```
You can't unfuse multiple LoRA checkpoints, so if you need to reset the model to its original weights, you'll need to reload it.
Now you can generate an image that uses the weights from both LoRAs:
```py
prompt = "A cute brown bear eating a slice of pizza, stunning color scheme, masterpiece, illustration"
image = pipeline(prompt).images[0]
image
```
### 🤗 PEFT
Read the [Inference with 🤗 PEFT](../tutorials/using_peft_for_inference) tutorial to learn more about its integration with 🤗 Diffusers and how you can easily work with and juggle multiple adapters. You'll need to install 🤗 Diffusers and PEFT from source to run the example in this section.
Another way you can load and use multiple LoRAs is to specify the `adapter_name` parameter in [`~loaders.LoraLoaderMixin.load_lora_weights`]. This method takes advantage of the 🤗 PEFT integration. For example, load and name both LoRA weights:
```py
from diffusers import DiffusionPipeline
import torch
pipeline = DiffusionPipeline.from_pretrained("stabilityai/stable-diffusion-xl-base-1.0", torch_dtype=torch.float16).to("cuda")
pipeline.load_lora_weights("ostris/ikea-instructions-lora-sdxl", weight_name="ikea_instructions_xl_v1_5.safetensors", adapter_name="ikea")
pipeline.load_lora_weights("ostris/super-cereal-sdxl-lora", weight_name="cereal_box_sdxl_v1.safetensors", adapter_name="cereal")
```
Now use the [`~loaders.UNet2DConditionLoadersMixin.set_adapters`] to activate both LoRAs, and you can configure how much weight each LoRA should have on the output:
```py
pipeline.set_adapters(["ikea", "cereal"], adapter_weights=[0.7, 0.5])
```
Then, generate an image:
```py
prompt = "A cute brown bear eating a slice of pizza, stunning color scheme, masterpiece, illustration"
image = pipeline(prompt, num_inference_steps=30, cross_attention_kwargs={"scale": 1.0}).images[0]
image
```
### Kohya and TheLastBen
Other popular LoRA trainers from the community include those by [Kohya](https://github.com/kohya-ss/sd-scripts/) and [TheLastBen](https://github.com/TheLastBen/fast-stable-diffusion). These trainers create different LoRA checkpoints than those trained by 🤗 Diffusers, but they can still be loaded in the same way.
Let's download the [Blueprintify SD XL 1.0](https://civitai.com/models/150986/blueprintify-sd-xl-10) checkpoint from [Civitai](https://civitai.com/):
```sh
!wget https://civitai.com/api/download/models/168776 -O blueprintify-sd-xl-10.safetensors
```
Load the LoRA checkpoint with the [`~loaders.LoraLoaderMixin.load_lora_weights`] method, and specify the filename in the `weight_name` parameter:
```py
from diffusers import AutoPipelineForText2Image
import torch
pipeline = AutoPipelineForText2Image.from_pretrained("stabilityai/stable-diffusion-xl-base-1.0", torch_dtype=torch.float16).to("cuda")
pipeline.load_lora_weights("path/to/weights", weight_name="blueprintify-sd-xl-10.safetensors")
```
Generate an image:
```py
# use bl3uprint in the prompt to trigger the LoRA
prompt = "bl3uprint, a highly detailed blueprint of the eiffel tower, explaining how to build all parts, many txt, blueprint grid backdrop"
image = pipeline(prompt).images[0]
image
```
Some limitations of using Kohya LoRAs with 🤗 Diffusers include:
- Images may not look like those generated by UIs - like ComfyUI - for multiple reasons, which are explained [here](https://github.com/huggingface/diffusers/pull/4287/#issuecomment-1655110736).
- [LyCORIS checkpoints](https://github.com/KohakuBlueleaf/LyCORIS) aren't fully supported. The [`~loaders.LoraLoaderMixin.load_lora_weights`] method loads LyCORIS checkpoints with LoRA and LoCon modules, but Hada and LoKR are not supported.
Loading a checkpoint from TheLastBen is very similar. For example, to load the [TheLastBen/William_Eggleston_Style_SDXL](https://huggingface.co/TheLastBen/William_Eggleston_Style_SDXL) checkpoint:
```py
from diffusers import AutoPipelineForText2Image
import torch
pipeline = AutoPipelineForText2Image.from_pretrained("stabilityai/stable-diffusion-xl-base-1.0", torch_dtype=torch.float16).to("cuda")
pipeline.load_lora_weights("TheLastBen/William_Eggleston_Style_SDXL", weight_name="wegg.safetensors")
# use by william eggleston in the prompt to trigger the LoRA
prompt = "a house by william eggleston, sunrays, beautiful, sunlight, sunrays, beautiful"
image = pipeline(prompt=prompt).images[0]
image
```